Seed Starting: What You Need to Know
- Carsen Delmont
- May 24, 2022
- 8 min read
Updated: Jan 4, 2023
Written by: Nick Oyler
When it comes to starting a vegetable garden or telling someone you grew your plants from seed, it is kind of a big flex. Although its not necessary to start your vegetables from seeds, it is extremely rewarding. That feeling when you finally harvest a tomato from a seed barely bigger than your pinky nail, it makes you feel like you’ve accomplished the biggest feat in the world.
When I first started gardening, I bought all of my vegetable starts from big box stores or my local nursery. So, why would you want to start seeds when you can just do that instead? I wondered the same thing a few years ago. It seemed like a lot of work. In fact, it can be a lot of work. That’s one of the disadvantages that may turn someone off of this method.
Let’s take a walk through some other disadvantages. Starting your garden from seeds can be an expensive method for growing plants depending on what kind of setup you would like to have. You may want grow lights, or want to make your own seed starting mix, or get seed starting trays, etc. This can add up quickly especially if you wanted to start a garden to help you save money on buying produce from the grocery store.
When getting all of these supplies, we come to the next con: space. Not everyone has the space for starting a lot of plants inside (and yes you do need to do this inside). All these materials take up space that not everyone has the room to store and use.
While there is quite the learning curve when it comes to growing from seeds, don’t let that discourage you from at least trying. There’s heaps of advantages to doing this method.
While I did mention above the initial cost of getting supplies, if you plan on having a garden for years to come, seed starting is actually one of the most inexpensive ways to plant a garden. On average, most varieties of seeds will last three or more years when stored correctly.
As far as seeds go, you will have a lot more varieties to choose from when ordering from seed catalogs or from the store. This opens up your garden for more biodiversity. Want purple carrots? Or glass gem corn? These aren’t varieties that I’ve seen at any of my local nurseries!
The sense of pride you receive from seed-to-table is a one of a kind emotional experience that you just don’t receive when buying plant starts.
So, now that that’s all said and done, where do you start? You probably want to go and get your hands straight in a bag of potting mix and plant some seeds. While I say “Go for it!”, you might want to do just a tiny bit of research before diving in. By research, all I mean is figuring out 1). What plants you want this year 2). What grows best in your area, and 3). When you need to start them.
Take a look at the size of your garden and determine what plants you want to grow. If you have a large garden, you can start a lot of varieties. If you only have one or two beds or a few containers, think about what kind of vegetables you want to eat. Don’t take up space in your garden for something you might not even eat.
I recommend looking at your USDA hardiness zone. Google is a great source for this. From here, you can now get a list of plants that grow well in your area. My favorite places to get this list is either from Google, a gardening friend, or your local nursery.
Now that you know what you want to grow and what you can grow, when do you start them? This depends on what you want to plant. When you look up your hardiness zone, you will also find your “last frost date”. This date is super important because this tells you when your area will be free from the fear of frost. Next, Google the crop you're growing. For example, it is ideal to start tomato seeds inside 4-6 weeks before your last frost date. For me, my last frost day is around May 7th to May 14th, this means I would start my seedlings somewhere around the beginning of April. Most seed packets you get will let you know this information, but Google is an amazing resource as well. If you happen to have a local plant nursery in your town, they are an amazing resource to utilize for this kind of information.
Alright, you got your list of plants, you’ve highlighted your calendar for when you can start sowing seeds, and you’ve got your seeds. Now what? It’s time to get your supplies together!
I’m going to split this supplies list into two sub-lists: basic supplies and optional supplies. The basic supplies are what you will need to start, while the optional supplies are, well, optional and not needed to get started.
Basic Supplies:
Vegetable seeds
Seed starting mix (fig 2)
Small pots / Seed cell trays (fig 1)
Plant labels
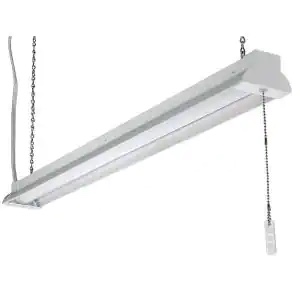
Grow light or shop light (5,000 Kelvin, 2,500 lumens) (fig 3)
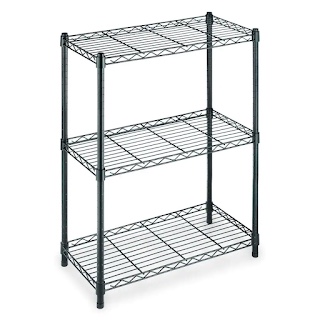
Metal Shelving (or any shelving) (fig 4)
Optional Supplies
Compost
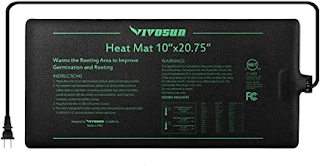
Seedling heat mat (fig 5)
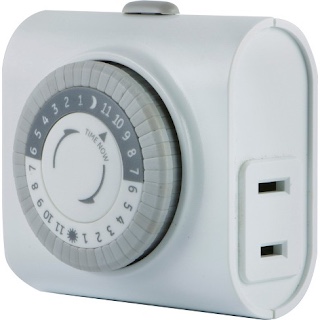
Timer (fig 6)


From here on out, if you think it’s just putting dirt in your plant trays and sowing your seeds… you’d be almost correct. It is that easy once you get down to it, plus a few sprinkles of other steps in there. Let me take you through the steps of getting your seeds started!
Grab a bucket or bowl and fill it up with your seed starting mix. If you happen to have compost as well, toss a few handfuls in there too. Take some water and start pouring the water over your mix to start moistening it. This will be important later on. You don’t want your mix to be dripping wet. If you take a handful of the mix, it should clump together when squeezed. It should also break apart easily as well. You don’t want water to drip out of it when it is squeezed.
Start filling your seed trays with soil. Fill in as many as you need to accommodate every seed you plan on planting.
Start sowing your seeds in each cell of the tray. For smaller seeds like tomatoes, lettuce, etc. place 2-3 seeds in each cell you are planning to grow the seed in. We will “thin” them out as they grow. For bigger seeds such as squash, cucumbers, or anything that size, place one seed per cell. Bigger seeds require you to put them deeper into the soil, while smaller seeds don’t need to be deep. Rule of thumb is: the bigger the seed, the deeper you need to place it into the soil.
Label each cell as you go with plant labels, or anything that will help you remember what’s in each tray. As much as you think you will remember what’s in each one, I promise you won’t. I made the same mistake my first year starting seeds and it was a disaster trying to remember what’s in each one.
I would consider the first 4 steps above as “Part 1”. For the next few steps gather your shelving grow light, and any of the other optional supplies such as the heat mat and timer.
Assemble your metal shelving if needed. Place in a spot that will be out of the way, but not a pain to get to. You don’t want to forget that you have plants growing.
For my shelving, I sat my shop/grow light on the shelf above where my plants are sitting. Some people hang their lights from chains. However you decide to do that, either make sure the height of the lights can be adjusted or the height of your seed trays can be lowered.
Place your seed trays below your light. You can place them within an inch of the light. You will slowly either move the light away (or lower the height of your plant trays) from your seeds. For my setup, I stacked boxes under my plant trays and took away the boxes as the plants grew. This was easiest for me since I didn’t have my light on an adjustable chain.
As your seeds germinate and begin to grow, move them slowly away from the light as they get taller. You do not want them to touch the light or be too close, it will burn the leaves.
If you have them, place your seedling on your seedling heat mat and hook up your lights to your outlet timer. I set mine to go on and off every 12 hours.
At this point, it is maintenance. Make sure to check the soil and water them if needed. In the very beginning, remember when we added water to our starting mix to make it moist? This helps your mix soak up water better. Pre-moistening your starting mix is an amazing technique so we can ensure that the water soaks into the moisture consistently. If your mix was dry, the water wouldn’t reach through the whole cell. Most seed starting mixes tend to be slightly hydrophobic, causing the water to sit on the top and run down the sides of the cell, not get soaked up in every part of the cell.
As days go by and you notice your seedlings grow, keep an eye on the ones in each cell that seem the healthiest. Remember, we only want one plant per cell. “Thin” out the weakest looking seedlings by cutting them at the soil level. I don’t recommend pulling them out. This will disturb the roots of the healthy seedling.
As your seedlings begin to grow larger, you will want to “up pot” them. All this means is putting them in bigger pots so they can continue to grow bigger. This will allow the roots to grow larger as well, leading to a healthier plant when you transplant them to their final home.
At this point, keep an eye on the weather in your area once your last frost date comes up. On that date, I will take a look at the weather for the next 10-14 days and observe the night time temperature. If you see that it doesn’t get below 45-50 degrees at night, that means it is time to begin the final part of this seed starting journey!
Since we have been growing your seeds inside, they will be weak to the outside elements. It will kill them to put them straight outside once they are big enough. There is this method called “hardening off” your seedlings which prepares them to be put outside. This helps your seedlings get acclimated to real sunlight and the outside elements so they can be put in your garden.
This technique is very simple to pull off. On the first day, take your seedlings outside and leave them outside for one hour. Bring them back inside.
On day two, sit them outside for 2 hours. Bring them back inside.
From this point, it’s simple. For day 3, sit them outside for 3 hours. On day 4… 4 hours. Keep doing this pattern until your plants are outside for all hours of daylight. At this point you can keep them outside overnight as well. This process should take around 2 weeks. The good thing about it taking this long, if you started doing this on your last frost date you will ensure that there will be no more worry of frost by the time they will be planted in their final spot, whether that be in a pot, raised bed, or an in-ground garden bed!
I hope at this point you feel more confident and comfortable when it comes to starting your vegetable garden from seeds. I’ll admit, it is very intimidating when you are first introduced. The sense of pride that comes from being able to say you started your plants from seeds is an unmatched feeling you can’t get elsewhere.
Get your hands dirty and remember to have fun. That’s all it comes down to!
Written by: Nick Oyler, admin of Carroll County MD Gardeners on Facebook.


Comments